Friday, November 13, 2009

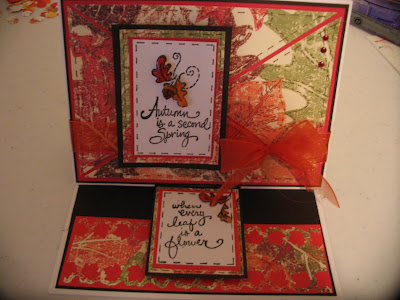
EASEL CARD WITH STITCHING


Crazy4Challenges issued a challenge to make an easel card (#10)and I combined it with the stitching on C4C card challenge #5. I hope they don't mind I am combining some so that I can catch up. I am such a slow poke some days. But we had an early Thanksgiving dinner with family in Oshkosh this week, and that took a little time since I really cook everyday.


My easel card uses the same Paper Studio leaf paper I've used for my last 3 cards which I just love and may even make another card with it before I am finished. : ) I used the brown umber and then red as matting. On the card front I cut the leaf paper into quilt pieces and used faux stitching around the leaves and edges. I found cutting the quilting pieces to be difficult because they HAVE to line up to look correct. I tied on the red/orange sheer ribbon which goes so well with this paper. The sentiment is a long vertical one and I masked off the parts I didn't want for the top. and then for the rest on the bottom. Make sense? This is such a sweet sentiment, "Autumn is a second spring when every leaf is a flower". I matted "Autumn is a second spring" with umber, leaf paper and red behind the white CS, stamped with Momento black ink. I colored the oak leaves with Stampin Up markers and popped them up over their place on the card, and covered them with Glossy Accents.


The bottom of the card was covered with umber brown. I cut a strip of the red and added it over the brown. Then I cut a little smaller piece of the leaf paper and punched it on both sides with the Martha Stewart leaf punch. This provided the "stop" for the card front. The sentiment on the front is a little to the left on purpose and the other half of the sentiment on the bottom is centered to draw the eye from left to right. The bottom sentiment is also matted in umber brown, leaf print, red and the white CS that has the stamped last half of the sentiment. There are also colored oak leaves that are covered in Glossy Accents. I added three little stick-on nail heads in rust for a little bling. I really enjoyed making this style of card and hope to crank out a few more for Christmas before the new year rolls around. LOL Only42 shopping days till Christmas, and there are 48 days till 2010. I guess I'd better get busy since I take my sweet time! Thanks for stopping by. I appreciate your comments and encouragements.

JUMPING IN LEAVES


Love these little House Mouse stamps. This one of a mouse jumping into a pile of leaves is so adorable and fun to color. Paper Studio leaf paper matted in brown, Martha Stewart leaf corner punch, Stampin Up markers used to color the mouse and leaves. Fun Flocking on the mouse to make him fuzzy, fussy cut and matted with the umber brown and popped the mouse and leaves up for dimension, finished with a red/orange sheer ribbon at the top.


The second card is the same design, but I added a striped sheer wired ribbon behind the mouse and leaves , and left off the Fun Flocking on the mouse. Has anyone used wired ribbon on cards? This is my second and it is OK and there are some lovely wired ribbons out there to play with. : )

REDO


I made a quick card for my friend Davi and I don't know why but it was a struggle that day, and I was not happy with the outcome. (You can check back a posting or two and see the other one.) SOOO, I made another on a different day and reworked it, and am now happy with the design.

This one I left the umber brown showing on the outer edges vertically, and added a leaf in umber brown and a sheer red/orange ribbon and bow which seems to finish it better. What do you think?

Thursday, November 5, 2009

MORE MICE


I just LOVE my House Mouse stamps. They make me smile and giggle and lift my spirits as they play, and enjoy the day doing whatever mice do best, which is getting into everything.

I really like how this card turned out. The image is a bit "naughty" but gets across the idea of surprise. I have really liked this streamer/confetti printed paper for a long time because it has lots of colors so lends itself to different applications. I need to find some more to keep in my stash for when they quit making it.

I matted the two verticals and the image in lavender and dark purple. Before I matted the image I was going to do it as a rectangle but the slope of the image gave me the idea of fussy cutting it out on top and leaving the bottom squared off. And I think that turned out pretty well. Before I stuck anything down, I wanted to figure out where to put some ribbon or embellishments. While shopping at Hobby Lobby (Boy do I like to look around that store!), I found a striped wider ribbon that was wired. No, I have never used wired ribbon on a card but the colors were perfect. I cut a piece an inch wider than the card on either side and attached the ribbon with red double stick tape (that you can't move after it is down), on the outer side of the left rectangle. I placed it and then proceeded to tape the second rectangle, being careful that the ribbon was just long enough to go across the front of the card and would not have excess at the edge. The wire actually helped give the ribbon some stability and was left in. It took a little adjusting, but I got it down, and popped the matted image over the ribbon.

I did not have a stamp that said "surprise" so just hand-wrote my own and matted it with the two shades of purple. I added 3 tiny rhinestones at the right corner of the image and one for the dot of the "i" in the sentiment. On the inside it says, "Happy, Happy, Happy Birthday". And I am happy, happy, happy with it. Thanks for stopping by and taking a peek.

Wednesday, November 4, 2009

OUR LITTLE FAIRIES


We took care of the two grand daughters for Halloween. We had been Trick or Treating in the morning at the grocery store and we got some shopping out of the way at the same time. What a deal!

In the evening after supper, the girls played in their fairy costumes while watching the Tinkerbell movie. It was cold out when we got ready to Trick or Treat at night. They just wore all of their "pink" outer wear and I called them my "Pink Patooties". We only went to two houses and they took their little "poodle purses" as their bag for candy. Here is a pictorial of each in their fairy costumes and Emma telling Matti a "fairy secret"! Too cute, even if I say so myself!

MORE LEAVES

I am NOT finished with Autumn yet. I have so many ideas for using leaves and some of the Autumn stamps I have. So bear with me as I play my way through my ideas. I promise I will be done before winter is officially here. LOL

I just finished up a BD card for Davi. Now I am going to admit that when I started it, I had no idea what I was going to do where or with what. I picked the leaf paper by Paper Studio and it had a cream background, so that required a cream card base which I normally don't use. But white just wasn't going to work!!! I then auditioned several solid colors of card stock for matting and chose to use the dark chocolate brown which accented the fall colors best. I decided to try out my new Martha Stewart leaf corner punch. It leaves a little border and punches out the maple leaf which then shows the matting underneath and leaves you with nice maple leaf cutouts to use somewhere else. : ) I wasn't sure where to go from here.

I stamped a few images and tried them out but nothing "rang my chimes". It took forever and I finally stamped a simple sentiment on a deep orange and matted it in a the dark brown and stuck it on the front. It needed something on the outside edges because I had cut the leaf paper a little short. I started adding some gold down the vertical edges. My pen malfunctioned and I wound up coloring in the gold leaving a small border of the deep chocolate brown. The gold really doesn't show the true color in the picture but it is all alomg the vertical edges. It might have been better if I had left the gold off and let the brown show down the sides. I just don't know! I couldn't even figure out where to put some ribbon or embellishments. It looked better in person but still lacking!!! I must have been in a fog or something. BUT it has been mailed and I am not sure what else I should have done or could have done different. But here's the picture and maybe you can suggest something so I can learn for next time. I welcome constructive criticism. Thanks for stopping by. Happy birthday early, Davi ! You ARE the best friend and SIS!

ANGELS


Every parent thinks their kids are the cutest, smartest, etc, etc, etc. Every grand parent thinks their grand kids are the cutest, smartest, etc, etc, etc. Why is that?

Do we see a reflection of ourselves in our kids and grand kids and in our "humble opinion" they must be like us? Or do we see qualities and characteristics we wish we had and knowing our lacks, desire better of them, for them?

Not sure which it is or if it is the Creator giving children of all races, creeds and color certain looks, smiles, eye sparkle, expressions, etc that reflect Him. Their laughter is infectious. We love them so much and they bring JOY into our lives.

Here are our two little angels. Emma in the pink hat and Matti in the white.

Tuesday, November 3, 2009

Jacques Fab Celebration Candy

Here is a quote from a very talented card maker who is celebrating some blog milestones and giving away some great candy to a lucky winner.

"I am celebrating my 6 month Blog Anniversary and I am so happy and humbled that I have had more than 58,000 visits and have more than 340 Followers!! Thank you so much to each of you!!! So I would like to give you an opportunity to win a Holiday Package from me which you see below!!! " http://jacquesmagnolias.blogspot.com/