Monday, February 15, 2010

SWIMMING BEAUTIES


I love to watch the two grand daughters at their swim lessons. They are progressing and this past Sat Emma dove into the 9' end and swam about 6 feet out, turned around and swam back to the side. Her strokes are not even yet, and her kicking is a little frantic at times, but she is not afraid and that is the best part.She is the blonde in the navy swim suit that has starfish around the neckline : ) Matti in the hot punk princess suit is progressing also but still doesn't like her head under the water. She tries everything and has lots of fun in the shallow end. The skills they learn will last their whole lives.

MY FAVORITE CARDINAL

Red Cardinals are one of my favorite birds. I have loved this image ever since I first saw it on ebay. Carolyn Shores Wright has an amazing talent and it shows in many of her stamp images. I used Stampin Up Watercolor Wonder Crayons to paint the image. I remembered a technique I learned from my wonderful friend Barb Hardeman when using an image that doesn't fit inside a Spellbinder die. She said you cut around the part that doesn't fit inside and lay it over the die on the flat side opposite where it will cut. Then you run it through your CB and Waa! La! You have kept your image intact but the majority is in the shape of your die. This is a cool technique! THANKS BARB for sharing!

I chose white card stock with evenly spaced red dots, and matted it in green. I wanted the cardinal to be the only thing you see and not fussy up the rest of the card with too much. I did break down and add a little red ribbon with white polka dots and just ran it across under the pop-dotted image which I had matted with a red layer from the next bigger Spellbinders. The little flowers look like the apple blossoms to me and I hunted until I found some silk ones just the right size at Micheals to stick on top of the paper ones. I so love how this card turned out. The sentiment is a part of a longer one but the "...for you" served my purposes. Inside it says "You bless me!" Hope you enjoy this card as much as I did making it.

BOOK MARKS AND CARDS


Here is a picture of a book mark and a sample card that the grand daughters made for their Tia Beth (our daughter). She made them the cutest Little Mermaid skirts to play dress up in. Here they are wearing them and holding the tails up so they can walk. Inside the card it says a big Thank You. They love playing dress up (Cinderella, Tinkerbell, Rosetta, Pocahontas, and Silver Mist and now mermaids.) The corners on the card are punched with an eyelet scalloped corner punch and is matted in pink as is the image.

TO MY SWEETHEART


I wanted to make my DH a really special card for Valentines Day. He is so sweet and helpful and kind and patient with me. I give him the majority of the credit for our marriage having lasted 44, almost 45 years (May). He is an amazing man, so smart, and always generous with me. I love him and hope my card reflects that love.

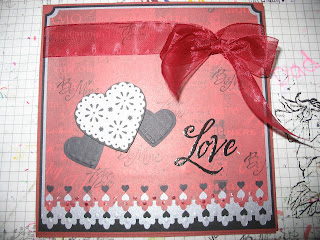
I created an easel card and I wanted it to be more masculine in color and used a darker red (it looks lighter with the flash!), with silver and black. I covered the white base completely with a deep red from one of my linen mat stacks. Oh, I also made it 6x6. I then cut a black mat and left it straight. I then added the silver mat and punched the bottom also with the Martha Stewart heart trefoil punch. The top layer is a paper of the deep red and it has "love" words in lots of languages. They are in a lighter shade of pinky red and show up better in the second picture. I wanted some black on there, so I stamped "true love" and "be mine" in black. They were small stamps so I could stamp them a couple of times each. I punched the paper with the same MS punch and because the paper is lighter weight, it broke the top surface of the paper where it embossed the little dots. Those looked white and I was not happy with the look. I took my cranberry ink pad and rubbed over them a little and it added enough color so that they don't look white.

To decorate the front, I punched a double slot in the upper corner about 1" from the edge in preparation for a sheer ribbon to be tied at the top. I also have the new MS eyelet heart punch. If you haven't seen this made up, it looks just like a paper doiley and not quite 2 inches across. I punched it in silver and matted it in black to make it show up on the red. It just looks so good with the trefoil heart border. I have a smaller 1" embossed waffle heart that is a MS punch too and I made two in black to put on either side of the silver one. I embossed the word LOVE in black, added my sheer cranberry ribbon around the top and brought it through the slots and tied a bow. The slots hold it in place and no adhesive was needed. So the top was done!

The inside is covered with the deep red "love word" paper first, and I reversed where I put the colors of CS. I punched the black, then the silver, then the solid linen lastly and each row of the punched design was totally visible. (All the tiny black punched hearts I glued on the front for another row of hearts under the word LOVE). I punched a cranberry heart with the embossed waffle punch and stuck a little piece of ribbon behind it. It became the "stop" for the front of the card.

The whole card was thick enough and big enough that I had to make a little box for it that was only 1/4" thick. It made it a little bit of a surprise since it was on his night stand when he woke up. Happy Valentines Day dear! I hope and pray we have many more. Thank you for almost 45 wonderful years.

PS Sorry I forgot to remove my SU table cover before I took the pictures. I usually photograph my cards directly on the white table. It is a bit distracting. : )

SOME CARDS

I have made a couple of cards when needed the last month. I will just show you and give a brief description of the process.

This sympathy card uses a Carolyn Shores Wright stamp of a light house on the beach with a storm coming in and the rain falling. It is not easy to color but is fun to try to make the storm and rain. On the inside it says "We walk by faith, not by sight". I used a teal and a black for the matting of the print which is really a teal colored vintage paper. It echos the color of the ocean.The image is matted in the same two colors and a jeweled rhinestone is in each corner. I didn't think any ribbon would be appropriate for this card.


This is my Valentine card for my mother. I used The Paper Studio Random Doodle Heart paper from my local craft store. I also used my new EK Success heart punch. It is so sweet. The corner is a little Marvy Uschida (SP?) corner punch. The sentiment on the front is stamped with cranberry and I rubbed around the edges of the Embossing Arts (1995) saying with cranberry, also. I added some pink artificial silk flowers using a small brad in the center of each and putting some pink Stickles on the brad and the petals to give them some sheen.
Inside I used a sweet saying to tell mom how special she is to me. I added a couple of sparkly hearts where the stamped ones were. I added a small box of candy in the package and a heart wind chime for her to hang up and remember how much I love her.

Sunday, February 14, 2010

HAPPY BIRTHDAY SON

I wanted to take this opportunity to wish my son a public "Happy Birthday"! I made his card on time, but this public acknowledgment of how special he is, is a wee bit late (His 36th BD was Feb 6th) due to me not getting on this machine and writing some postings.

Our son is considerate, kind, giving, and loving. He is a gifted husband, father, son, and computer professional. We are extremely proud of him. He was/is our Eagle Scout and lives by the 12 points of the Scout Law that he learned years ago (trustworthy, loyal, helpful, friendly, courteous, kind, obedient, cheerful, thrifty, brave, clean, reverent). I guess the Scripture "Train a child in the way he "should" go and when he is old he will not depart from it" really does bear lasting fruit in children. They need limits and to learn to know GOD, to respect HIS authority and honor and obey HIM and those in authority over them. I believe their opportunities for decision making should be matched to their age and abilities, but they also have to learn that there are times when some decisions are not up for discussion. With GOD, somethings are not up for discussion either. Our two turned out to be very special adults and so we salute them both. Thank you for being such wonderful human "beans"! LOL!

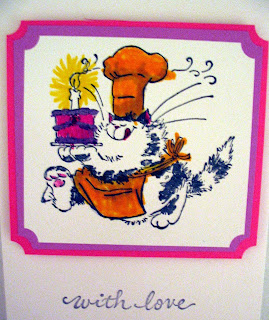
This is the birthday card my son's two daughters colored with a little help from Mamaw (me). I did the stamping and cutting but they did the punching of the corners with the ticket punch and sticking on the pop dots and peeling off the papers and sticking it down. They are getting pretty good with the brush markers, and like unusual colors for things sometimes, which make them all the sweeter. (Their favorite colors are pink and purple, so that is why we picked those mat colors. )

SURPRISE!!! I"M STILL HERE!!!!


It has been a month since I posted anything! YIKES! Where did the time go? I have been creating but just didn't get around to posting anything or doing any challenges, etc. I am often playing with the grand daughters. They will be 5 and 4 next month and they are so much fun. We "create" together some days and they are learning to use pop dots and adhesives and paintbrush markers with age appropriate skill of staying in the lines (for now).

We spent the better part of the two weeks prior to their Valentines party on Feb 12th making a Valentine bookmark for each child (42 in all) and 7 Valentine cards for the teachers. The oldest is in a Pre K class. Two teachers come over from the school district and teach the morning with them, then they have regular day care in the afternoon. Emma knows the shape of all her letters, writes them all, and can sound out simple words. She will be ready for the all day kindergarten next fall, although she still likes her naps. Matti has the same two teachers all day but one had a baby mid term, so there is a substitute and that makes three.

For their book marks, I cut generic CS into 5 1/2"x2" strips, used the corner rounder on all the corners, punched a 1/4" hole at one end and stamped a rectangle "Happy Valentines Day"that has a dotted border around it and I centered it. This sentiment is only 1/2" wide and about 2" long...one of those dollar finds from somewhere. I collected a variety of small heart stamps and Emma and Matti stamped their favorites around the outer border in pink and red. This was Phase 1 of the project and they took a couple of hours to do this part. (You can see a picture of one of them in another post in this grouping.)

Two of the stamps looked quilted and so they took some of my older brush markers and colored to their hearts content on each one. This also took a couple of hours on another day. This was Phase 2. No Matti, these are not smelly markers!

Phase 3 consisted of working on the 7 cards for the teachers. I did the cutting of CS and punching and used two types of heart paper and put just a simple scallop on one edge and the strips that were left (about 1/8th-1/4" wide) I put above for some added interest. They helped run the dotted adhesive to stick them on with a little help.

Another day for Phase 4, we stamped and colored a little country girl Stampin Up image (1996 I think but I don't know what set.) holding a heart and above her it says "From The Heart". I colored a sample and then let them have at it and do whatever their creative heart told them to do. I cut a pink mat and let them punch the corners of the image and the mat with the corner rounder for all 7 cards.

Still another day for Phase 5 they took a small "From" stamp and stamped on the back of the book marks. Then we took a clear alphabet set and they stamped their names on each one. I think they had the most fun with this one as they could see the stamp on the CS and watch the transfer of ink to the CS and they acted like it was magic. Maybe for all of us stampers, it IS a little bit of magic to our creative souls. : ) They had to take turns and so I had them stamp Happy Valentines on the inside of the teachers cards and sign with the clear name stamp they used on the bookmark. WHEW! A big job accomplished and I still had to attach the ribbons to the book marks. I bought small clear cellophane treat bags and their parents filled them with candy and tied on the book mark and each child got one at the party.

While this SEEMS to be a huge undertaking with young children, when you break it up into smaller projects or phases and don't over load them too much at any one sitting, they can accomplish wonderful things, even at young ages. I want to leave them with a legacy of knowing their grandma and having fun times creating and encouraging the creator inside them. I have said this before that I believe God made each of us in HIS image and part of that is HIS creativeness. HE made everything and we belong to HIM and learning about HIS creation and HIS creative side, is what we spend most of our lives doing. I want to encourage their creative side and their knowledge of HIM in the process and I pray they will come to know HIM as their Lord and Savior.

So that is part of my month's activities. Thanks for stopping by to visit with me.